
How to Install ELS (Emergency Lighting System)
ELS not only enhances visual appeal but also adds realism and functionality. In this guide, we'll walk you through installing ELS for your FivePD server,
ELS not only enhances visual appeal but also adds realism and functionality. In this guide, we’ll walk you through installing ELS for your FivePD server, including configuration tips and troubleshooting.
What is ELS?
The Emergency Lighting System is a GTA V modification designed to improve emergency vehicle lighting. ELS enables:
- Customizable light patterns.
- Realistic siren and light synchronization.
- Keyboard shortcuts for lighting modes.
ELS integrates seamlessly with FivePD, allowing players to use advanced features during patrol missions.
Installation Process
Step 1: Prerequisites
Before diving into the installation, ensure you have the following:
- A functional FivePD server.
- GTA V installed on your PC.
- ScriptHookV and a modding-compatible game version.
- ELS mod files (download)
Step 2: Downloading ELS
- Download the latest version of ELS.
- Extract the downloaded ZIP file using WinRAR, 7-Zip, or a similar tool.
Step 3: Installing ELS on Your Client
- Locate Your GTA V Directory:
- For Steam users:
C:\Program Files (x86)\Steam\steamapps\common\Grand Theft Auto V - For Rockstar Launcher users:
C:\Program Files\Rockstar Games\Grand Theft Auto V
- For Steam users:
- Copy the extracted ELS files (e.g.,
ELS.iniand other mod files) into the root directory of your GTA V folder. - Place vehicle configuration files in the
ELSfolder created in your GTA V directory. - Install ScriptHookV by copying its files (
dinput8.dllandScriptHookV.dll) to the root folder.
Step 4: Installing ELS on the Server
- Upload ELS Resources:
- Access your server files via FTP or a file manager.
- Navigate to the
resourcesfolder. - Create a new folder named
elsand upload the ELS server files.
- Edit the Server Configuration:
- Open the
server.cfgfile. - Add the line:
ensure els - Save and restart the server.
- Open the
- Sync Vehicle Files:
- Ensure all ELS-configured vehicles are added to the server’s
resourcesfolder. - Verify that vehicle meta files (e.g.,
vehicles.metaandcarvariations.meta) reference ELS settings.
- Ensure all ELS-configured vehicles are added to the server’s
Own Installation Guide
- Clone the repository or download the latest version.
- If cloning, use the following command:
git clone https://github.com/MrDaGree/ELS-FiveM [ELS]Make sure you are in theresourcesdirectory before executing this command.
- If cloning, use the following command:
- Place the cloned or downloaded folder inside your server’s
resourcesdirectory. - Create a file named
vcf.luaand copy the contents ofvcf.default.luainto this file without deleting the original. - Make necessary adjustments to
vcf.luaas required. - Place all VCF files inside the
vcfdirectory to ensure they are recognized. - Restart the server and enjoy the enhanced lighting controls.
Convars to use
Convar
Parameters
Function
Example Usage
Default State
els_outputLoading
boolean
Outputs the loaded vehicles specified in the vcf.lua.
setr els_outputLoading true
false
els_debug
boolean
Prints debug information for troubleshooting.
setr els_debug true
false
els_developer
boolean
Enables developer features (use cautiously).
setr els_developer true
false
els_warnOnJoin
boolean
Warns if the current version is outdated.
setr els_warnOnJoin true
false
Step 5: Configuring ELS
- Open the
ELS.inifile in your GTA V directory. - Modify key bindings and light patterns as needed. For example:
[KEYBINDS] PrimaryLightingMode = F SecondaryLightingMode = G - Save the file and test configurations in-game.
Default Controls
Keyboard
Q– Up 1 light stageLCTRL + Q– Down 1 light stage1, 2, 3– Siren tonesLCTRL + =– Takedown lights9– Increase primary pattern8– Increase secondary pattern7– Increase traffic advisor patternLCTRL + 9– Decrease primary patternLCTRL + 8– Decrease secondary patternLCTRL + 7– Decrease traffic advisor patternY– Toggle warning lightsU– Toggle secondary lightsL– Toggle primary lightsLCTRL + P– Toggle panel
Controller
B– Up 1 light stageA + B– Down 1 light stageDPAD Down– Siren tone 1DPAD Left– Siren tone 2DPAD Up– Siren tone 3LS– HornA + DPAD Right– TakedownsA + LS– Enable/Disable dual sirenA + DPAD Down– Dual siren tone 1A + DPAD Left– Dual siren tone 2A + DPAD Up– Dual siren tone 3
Step 6: Testing ELS
- Launch GTA V and connect to your FivePD server.
- Spawn an ELS-enabled vehicle using the in-game menu or commands.
- Test the lighting controls:
- Primary Lights: Activate using the default key (e.g.,
F). - Secondary Lights: Toggle with the assigned key (e.g.,
G). - Siren: Synchronize with lighting modes.
- Primary Lights: Activate using the default key (e.g.,
Common Issues and Troubleshooting
- ELS Lights Not Working:
- Verify that ELS-configured vehicles are properly installed.
- Check the
ELS.inifile for key binding conflicts.
- Server Crashes After Installing ELS:
- Ensure the ELS resource is correctly added to
server.cfg. - Look for errors in the server console.
- Ensure the ELS resource is correctly added to
- Missing Textures or Models:
- Double-check vehicle model files and ensure all dependencies are uploaded.
- Confirm that meta files are synced with ELS settings.
Tips for Optimizing ELS
- Use Pre-Made Configurations: Download ELS vehicle configs from trusted modding communities.
- Assign Unique Keys: Avoid conflicts by customizing key bindings.
- Backup Files: Always create backups before modifying server or client files.
Functions
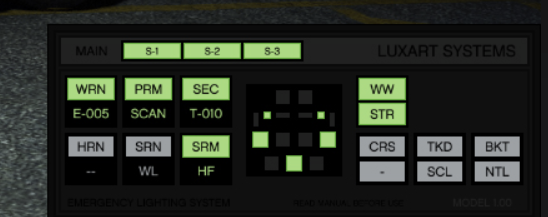
Here’s a breakdown of what this Luxart Systems Emergency Lighting System (ELS) panel means, along with a detailed explanation for each button and feature. This will help players understand how to use the system for emergency vehicle lighting in FiveM.
Main Buttons (S-1, S-2, S-3)
These are the main lighting stages that control the intensity and type of emergency lights:
- S-1: Activates minimal lights, usually parking lights or warning lights for low-priority situations.
- S-2: Turns on additional lights, such as rear flashers, often used for traffic stops or higher visibility.
- S-3: Activates full emergency lights, including front, rear, and side flashers. This is used in urgent situations like pursuits.
Buttons and Functions Explained
Here’s what each button on the panel does:
Top Row Buttons
- WRN: Turns on warning lights, typically used for stationary vehicles or roadblocks.
- PRM: Activates primary lights, which include the main front and rear flashers.
- SEC: Turns on secondary lights, which may include alley lights or takedown lights for additional side or front lighting.
Middle Buttons
- E-005: Likely a preset lighting configuration. Pressing it activates a specific set of lights programmed into the system.
- SCAN: Activates scan mode, where lights cycle through patterns for better visibility.
- T-010: A timer-based or pre-programmed pattern trigger that enables a specific lighting sequence.
Horn and Siren Controls
- HRN: Activates the horn, useful for alerting traffic without activating the siren.
- SRN: Turns on the siren, often used alongside emergency lights.
- SRM: Selects the siren mode or changes the tone of the siren.
- WL: Warning light toggle, possibly controlling low-beam warning lights.
- HF: High-frequency sound toggle for specific emergency situations.
Directional Controls
The center grid of arrows controls the directional lights. These are used to guide traffic or indicate where vehicles should move:
- Left arrows: Flash left-side lights for directing traffic left.
- Right arrows: Flash right-side lights for directing traffic right.
- Center arrows: Activate center flashers to block both sides or signal straight-ahead warnings.
Right-Side Buttons
- WW: Turns on wig-wag lights (alternating headlights for high visibility).
- STR: Activates strobe lights, which are very bright and attention-grabbing.
Special Functions
- CRS: Likely stands for Cruise Lights, which are steady, low-intensity lights.
- TKD: Takedown lights, often used to illuminate the area directly in front of the vehicle.
- BKT: Activates backtrack lights, which may be rear-facing flashers.
- SCL: Possibly stands for scene lighting, used to light up the area around the vehicle.
- NTL: Likely controls night lighting, which dims the lights for nighttime use to avoid blinding other drivers.
How to Use This Panel
- Start by selecting S-1, S-2, or S-3, depending on the situation:
- S-1 for low priority.
- S-2 for moderate visibility.
- S-3 for full emergency mode.
- Use WRN, PRM, or SEC to control specific lighting functions.
- Adjust the siren and horn using HRN, SRN, or SRM for audio alerts.
- Use the directional arrows to guide traffic.
- Customize additional lighting effects using WW, STR, CRS, etc.
Conclusion
Installing the ELS System is a game-changer for FivePD enthusiasts looking to add realism and depth to their gameplay. By following this guide, you can enjoy the benefits of advanced emergency lighting controls on your server. Don’t forget to test and fine-tune your configurations for the best experience. Happy patrolling!